How to Fix Shrink Volume Greyed Out and Enable Shrink Volume
Summary
This guide explains why the shrink volume option is greyed out or disabled in Disk Management and how to shrink the C drive or any other drive using free partition software.

Updated on 2026/06/05
by Andrew Wright
| Disk Management | Diskpart | Partition Resizer* | |
| Shrink FAT32 partition | NO | NO |  |
| Shrink NTFS partition | |
|
|
| Shrink Volume contains unmovable files (pagefile, hibernation file, usually on the C drive), insufficient free space | NO | NO | |
| Move Partition/Unallocated Space | NO | NO | |
| Extend NTFS partition (unallocated space is contiguous on the right side) | |
|
|
| Extend NTFS partition (unallocated space is contiguous on the left side) | NO | NO | |
| Extend FAT32 C drive | NO | NO | |
| Price | FREE | FREE | FREE |
| Download Win 11-7 (100% Free) Download Win Server (Free Demo) |
Can't Shrink Volume - The Causes
The "Shrink Volume" option may be greyed out in Disk Management due to the following causes. (Shrinking volumes will not work in diskpart.exe for the same reasons.)
-
1. FAT File System: Windows Disk Management only supports shrinking volumes formatted with the NTFS file system.
If the partition is formatted as FAT32, the "Shrink Volume" option will be disabled. Likewise,
diskpartcannot shrink FAT32 volumes. Converting the file system to NTFS may resolve the issue, though it should be done with caution and a backup. -
2. Unmovable Files or Insufficient Free Space: Certain system files, such as the page file (
pagefile.sys), hibernation file (hiberfil.sys), or system restore points, may reside near the end of the volume. Since these files cannot be moved easily, they can prevent the volume from being shrunk. Additionally, if the partition lacks enough contiguous free space, the shrink operation will fail. Disabling hibernation or virtual memory temporarily may help in some cases. - 3. Volume Is Encrypted or Locked: If BitLocker encryption is enabled on the volume, or if the disk is in use or locked by another process, Windows may prevent any resizing operation for safety and integrity reasons. Unlocking or decrypting the drive can allow Disk Management to proceed with shrinking.
- 4. USB Drive or Non-Standard Partition Style: External USB drives, particularly flash drives, often use removable media standards or lack a proper MBR (Master Boot Record) or GPT (GUID Partition Table) scheme. Shrinking is typically disabled on these devices because they do not support the advanced partitioning operations required.
- 5. Shadow Copies or System Protection Enabled: If system protection is enabled for the drive, it may reserve a portion of disk space for restore points. This can interfere with the shrinking process, especially if restore points are stored near the end of the volume.
-
6. Corrupted File System or Disk Errors: If the file system is corrupted or there are bad sectors on the drive, Windows may disable disk resizing options until errors are repaired.
Running
chkdskor scanning the drive for errors may help in resolving this issue. - 7. OEM or Recovery Partitions: You cannot shrink the OEM or Recovery partition. Some system partitions created by PC manufacturers or recovery tools are specially configured and cannot be modified using standard Disk Management tools. These partitions may also contain hidden flags that prevent any shrinking or resizing.
Based on the above causes, here are some possible scenarios:
- Can't shrink USB drive.
- Can't shrink volume because the shrink option is greyed out in Disk Management.
- Windows Disk Management is unable to shrink the C drive.
So, how do you shrink the C drive in Windows 11/10/8/7? Or how do you shrink a D/E/F/H drive when the shrink volume option is greyed out? 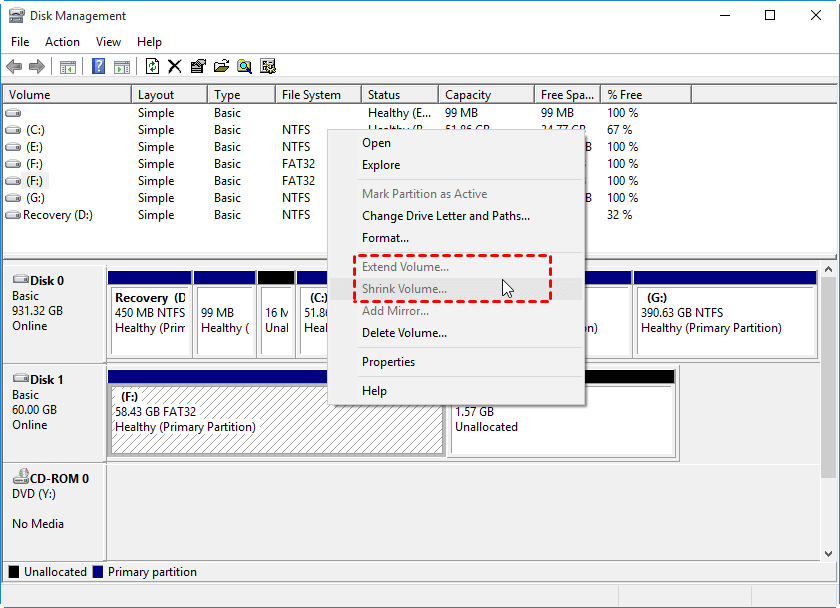
Solution 1 - Shrinking Volume with Partition Resizer Free
Shrinking any drive even the C drive is possible with the free tool Partition Resizer. This example will show you how to shrink the volume without losing data. You can also shrink any other volume using Partition Resizer without losing data.
Video 1: Shrink the D/E, or another drive to extend the C drive.
(Right-click the D drive, then drag its border to shrink it. If necessary, move any intervening partitions to create unallocated space that is contiguous to the C drive, then expand the C drive.)
Video 2: Shrink the C drive to extend the D or E drive.
In Partition Resizer, right-click the C drive, then drag its border to reduce its size, creating unallocated space. Then, right-click the target partition (D or E) and expand it. If an intervening partition blocks the expansion, right-click the blocking partition and move it to reposition the unallocated space. Repeat this process for any other blocking partitions as needed.
Video 3: Shrink C and create another drive
For Windows 11/10/8/7 => Download Partition Resizer Free [100% Free]
For Windows Server 2025-2003 => Download Partition Resizer Server [Trial]
Step 1: Download and install Partition Resizer, then open it.
Step 2: Right-click the C drive in Partition Resizer and then select the option RESIZE/MOVE PARTITION. 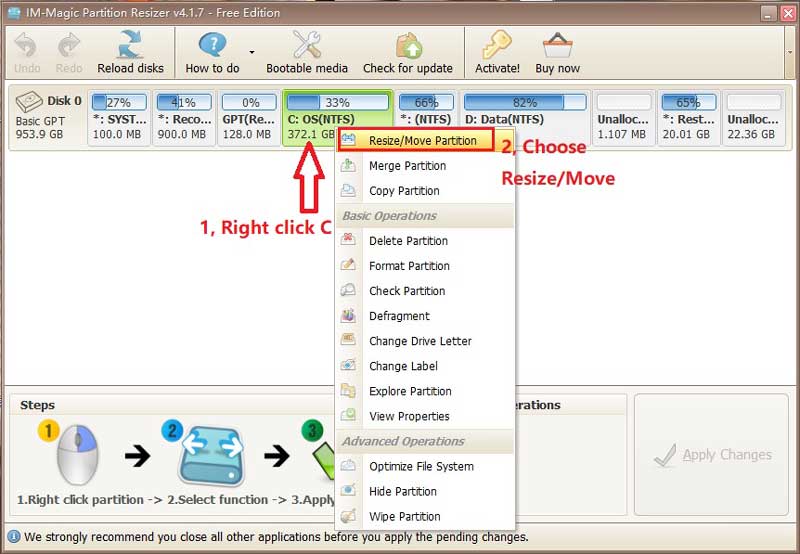
Step 3: Shrink the partition by moving its left border forward when the mouse shows double arrows, and then adjust the border to shrink the space. 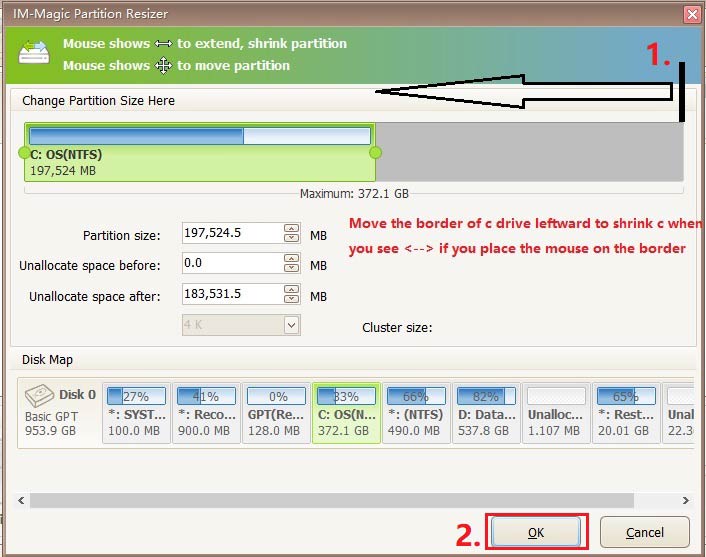
If it’s the C drive that you want to shrink, move the left border of the partition forward, and free space will be created on the right side of the C drive. 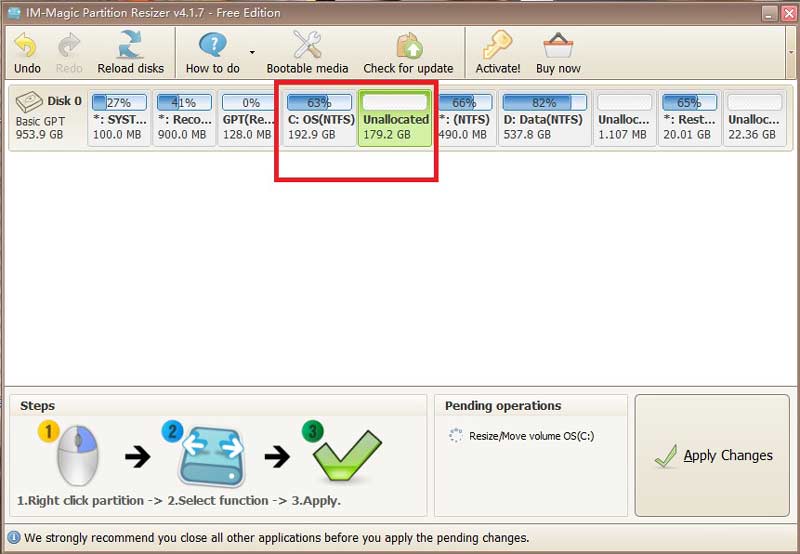
Step 4: Click the APPLY CHANGES button in the software to shrink the drive.
Also read: How to shrink the C drive
IM-Magic Partition Resizer Server is for all Windows Server OS like Windows 2019, 2022, 2025, 2008, 2012, 2016 etc.
For all Windows Server versions => Download IM-Magic Partition Resizer Server
After shrinking a volume, you may want to:
- Create a new partition
- Add the free unallocated space to another partition
- Move free space
- Convert free space to unallocated space by right-clicking it and deleting the volume
Note: When it's unable to shrink a FAT32 partition with Disk Management or Diskpart, you can use the free tool Partition Resizer to easily resize the FAT32 partition without losing data.
Solution2: Shrink Partition Greyed Out Fixes
Note: When Shrink Volume option is not available in Disk Management, try free tool Partition Resizer that can simply help resize, shrink, move and extend partitions without losing data in an easier way. It's much more complicated and harder to shrink volume using Disk Management if it's disabled.
If the "Shrink Volume" option is greyed out in Disk Management on Windows, and you insisit on enabling it when the system cannot reduce the size of the partition. Here are the possible fixes:
1. Check for Unmovable Files
- The volume may contain unmovable files (like the page file, hibernation file, or system files) that prevent shrinking.
- Solution:
- Run Disk Cleanup (
cleanmgr) to remove unnecessary files. - Disable hibernation (if not needed) via Command Prompt (Admin):
powercfg /h off - Temporarily disable the page file:
- Press Win + R, type
sysdm.cpl, and go to Advanced → Performance → Settings → Advanced → Virtual Memory → Change. - Select No paging file, click Set, then OK, and restart.
- Press Win + R, type
2. Run Defragmentation
- Fragmented files can block shrinking.
- Solution:
- Run Defragment and Optimize Drives (
dfrgui). - Alternatively, use the Defrag command in Command Prompt (Admin):
defrag C: /X /U /V
3. Check for File System Errors
- Corruption can prevent shrinking.
- Solution: Run CHKDSK:
chkdsk C: /f /r
(Restart if prompted.)
4. Use Third-Party Tools
- If Disk Management fails, try tools like:
- IM-Magic Partition Resizer (Free)
5. Convert to Dynamic Disk (Not Recommended)
- If the disk is dynamic, shrinking may be disabled.
- Solution: Convert back to Basic Disk (may require backup & reformat & will lose all data).
6. Check for Recovery Partitions
- Some OEM partitions prevent shrinking.
- Solution: Use
diskpartto check partitions:
diskpart

    list disk

    select disk 0

    list partition
(If a recovery partition is blocking, you may need to delete it—backup first.)
7. Ensure Enough Free Space
- You can only shrink up to the available unallocated space.
- Solution: Delete unnecessary files or move data to another drive.
8. Disable BitLocker (If Enabled)
- Encrypted drives may block shrinking.
- Solution: Suspend BitLocker via Control Panel → BitLocker Drive Encryption.
9. Use diskpart to Force Shrink
- Open Command Prompt (Admin) and run:
diskpart

    list volume

    select volume X (replace X with the volume number)

    shrink desired=10240 (shrink by 10GB, adjust as needed)
10. Check for MBR vs. GPT
- MBR disks have limitations (max 4 primary partitions).
- Solution: Convert to GPT (requires backup & reformat).
Shrink FAT32 Partition with Diskpart?
The problem: Diskpart and Disk Management will not shrink a FAT32 drive. (The file system is labeled as FAT or FAT32 in Windows Disk Management or diskpart.)
Solutions:
- 1. Shrink the FAT32 partition using the free tool Partition Resizer.
- 2. Convert the FAT32 drive to NTFS, and then the "Shrink Volume" option will be available. (Note: This won’t work on the C drive.)
The question: Is it safe to convert a drive from FAT32 to NTFS?
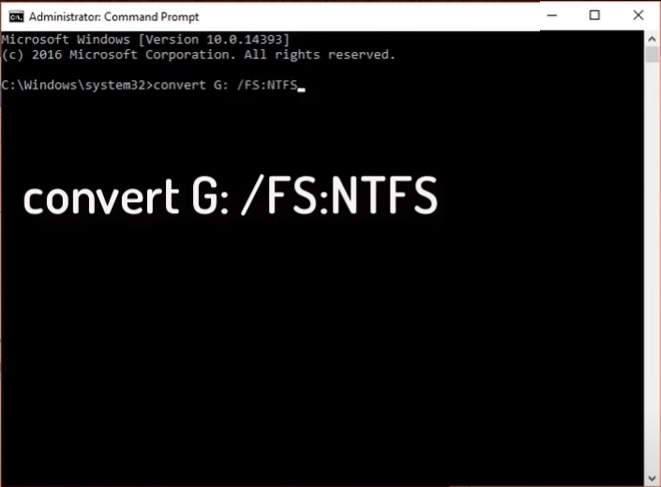
Answer: Yes, it’s safe to use Windows built-in tool to convert a non-OS disk from FAT32 to NTFS without formatting or data loss using the Windows built-in convert command in the Command Prompt. (Won't work on C drive)
Key CMD: Convert G: /FS:NTFS
Note: It's not in diskpart cmd, just the CMD. You need to know your drive letter first. It's no data loss.
Video - How to convert FAT32 to NTFS without formatting: (Won't work on C drive)
Once you have converted the drive to NTFS, you can shrink the volume using diskpart or other tools.
Also read: